Rails Overview
Full Stack Web WEBD-2007
Red River College
Ruby on Rails

Rails is a web application development framework written in the Ruby language.
Rails was designed to make programming web applications easier by making assumptions about what every developer needs to get started.
It allows you to write less code while accomplishing more than many other languages and frameworks.
Reading Railroad

If you haven’t already, work your way through the Getting Started with Rails Tutorial by coding along while you read. This should take an hour of your time and will expose you to the various components of the Rails MVC workflow.
Familarize yourself with the other Rails Guides as well as the Rails API.
* * *
When you have the urge to Google for some Rails coding help, RTFM instead.
Read These Friendly Manuals.
Model View Controller
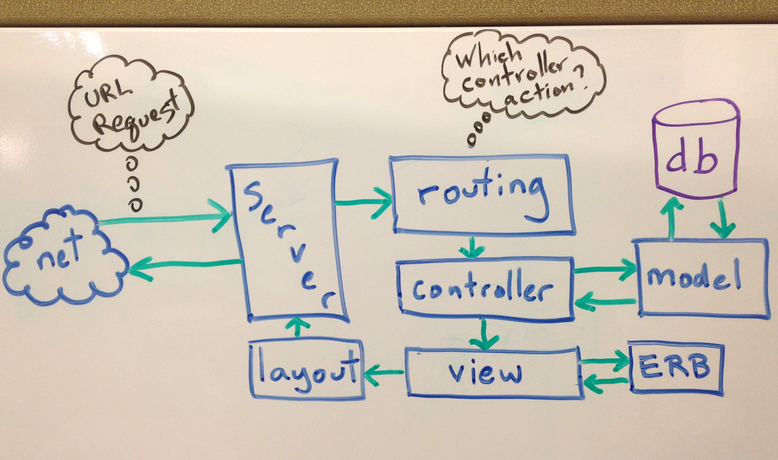
A Rails application flow chart.
Routing: The Rails router determines which controller action to execute. We can map specific URLs to controller actions using the /config/routes.rb file.
Controller: The controller acts like a bridge between the Model and the View. The controller requests data from the database by way of the Model. Any data that is saved to an instance variable in the controller will be available in the associated view. Each controller is a Ruby class that extends ActionController::Base.
Model: The model is our ORM (Object Relational Mapper) which allows us to query our database tables using Ruby code rather than SQL. The results from our queries are wrapped in Ruby objects. Most models are Ruby classes that extend ActiveRecord::Base.
View: The view is the HTML used to display the data gathered by the controller. The view can also contain embedded ruby code (ERB) which is execute on the server.
Layout: The layout is a template HTML document within which all views are displayed. The HTML code common to all views is stored in the layout.
Not shown here is the source of the request, a user’s web browser requesting an URL by way of HTTP.
Creating a New Rails App
Much of our work with Rails happens at the command line. For example, to create a new Rails application we type the following at a command prompt:
rails new project_name
Where project_name is the actual name of the project we wish to create. Rails will then generate the file/folder structure of an empty Rails project in the current folder.
By default new Rails apps are configured to use SQLite as their database.
Creating a New Rails App (PostgreSQL)
Since we have Postgres available on our development environment we can ask Rails to use Postgres instead of SQLite when creating a new rails application:
rails new project_name --database=postgresql
You’ll need to install and configure Postgres either for Windows or within the WSL. You’ll also need to set a Postgres username/password and add this user to the config/database.yml file like so:
development:
  <<: *default
  username: your_postgres_user # This line was added.
  password: your_postgres_pass # This line was added.
  database: myapp_development
After this we must navigate to the project folder and ask Rails to create the database for us:
cd project_name
rails db:create
The Rails Development Server
To test a Rails application we need to start up a local web server. From the Rails application root folder run the following from the command prompt:
rails server -b 0 -p 3000
Or for short:
rails s
The -b binds the server to any local IP address. This is only important if you are running Rails on a VM.
The -p sets the server port to 3000. The default port is 3000.
Scaffolding a Rails MVC Bundle
We can have Rails generate a Model View Controller bundle for us by describing the data we which to store in our database. For example, to scaffold a products database table:
rails g scaffold product name:string description:text price:decimal stock_quantity:integer
If you’ve gone through the Getting Started Guide or the Rails Blogging Tutorial notes, you’ll know that this command creates all the routes, controllers, migrations, models and views needed to perform CRUD tasks on a specified resource by way of a web browser.
The scaffold command doesn’t create the required products table in the database. To create that table we need to run:
rails db:migrate
Generating a Controller
To generate an empty controller:
rails g controller controller_name
To specific the actions in the controller upfront (and have Rails generated the associated views):
rails g controller controller_name action1 action2 action3
Where action1, 2 and 3 are the names of actions you want to include in your controller.
Generating a Model
Generating a model is similar to generated a scaffold, except only the model and the migration in built:
rails g model product name:string description:text price:decimal stock_quantity:integer
Remember that when generating either a scaffold or a model you also have to prepare the database by running:
rails db:migrate
Removing Generated "Things"
But what if you want to remove a generated scaffold, model, or controller?
If you’ve been diligent with your git commits and your branching you can rollback the changes using version control.
You can also remove generated “things” using the rails destroy command:
rails d scaffold Product
rails d model Product
rails d controller products
ActiveRecord
From the ActiveRecord Rails Guide:
“Active Record is the M in MVC - the model - which is the layer of the system responsible for representing business data and logic.
Active Record facilitates the creation and use of business objects whose data requires persistent storage to a database.”
ActiveRecord Resource:
Rails Migrations (Add Column)
Rails Migrations allow us to make incremental changes to our Models.
To add an image property (type string) to the demonstration blog app, we ran the following migration generator from the command line:
rails g migration add_image_to_products image:string
The naming here is important. Whenever we want to add a new column to a table the command follows this form:
rails g migration add_column_to_table column:type
(Where column in the name of the column to add, table is the name of the table to be modified, and type is the database of this column.)
The first migration command above would generate a migration in the db/migrate folder called 20121107184925_add_image_to_products.rb:
class AddImageUrlToProducts < ActiveRecord::Migration
  def change
    add_column :products, :image, :string
  end
end
Next we use the rails command to run the migration:
rails db:migrate
NOTE: If we want a newly added column to be set-able from a view form, it must be added to the attr_accessible list in the associated model.
Rails Migrations (Remove Column)
We can also use migrations to rename columns, remove columns, add indexes, etc.
For example, to remove a String column named image from the products table:
rails g migration remove_image_from_products image:string
Configuring Routes
Routes are how our Rails application turns the URLs it receives into calls to a Controller action. Routes are configured in the config/routes.rb file.
If, for example, we are building routes for a Products controller and we want all seven CRUD routes we need only add:
resources :products
If we only wanted the index and show routes:
resources :products, only: [:index, :show]
We can also manually generate routes by following this pattern:
httpverb 'url/path' => 'controller#action', as: 'named_route'
So to generate the index route for a products controller:
get 'products' => 'products#index', as: 'products'
If we want to generate a member route (one that makes reference to a specific product by id) like show:
get 'products/:id' => 'products#show', as: 'product', id: /\d+/
Member routes like this contain placeholders (in this case :id, which is constrained to a number with the regular express at the end). The actual id sent via the URL will be accessible in the controller action via the params hash. So the products show action might look like this:
def show # Within the products controller
  @product = Product.find(params[:id]) # Find the product with the primary key mentioned in the URL.
end
Setting the Root Route
In the Rails routing file (config/routes.rb) we can specify which controller action to execute when our users visit the root of our domain.
For example, to set the products controller’s index action as the domain root:
root to: 'products#index'
When using our development server we can invoke this route by visiting http://localhost:3000/
Important: In order for this route to work properly, the index.html file in the public folder must be deleted.
The link_to Helper
Once you have routes in place you may want to link to these routes from a view. We use the link_to helper to build our links in Rails.
Linking to some of the routes defined above:
# Links to the "products" route:
<%= link_to 'All Products', products_path %>

# Links to the "product" route, given a Product variable named "product":
<%= link_to product.name, product %>

# Links to the root route:
<%= link_to 'Home', root_path %>
Rails View Partials
Partials are a device for breaking the view rendering process into more manageable chunks. With a partial, you can move the code for rendering a particular view to its own file. This allows us to keep our view code DRY.
Render the _menu.html.erb file found in the current folder:
<%= render 'menu' %>
This is a short-cut for:
<%= render partial: 'menu' %>
If the _menu.html.erb file isn’t in the current folder, for example the app/view/shared folder:
<%= render 'shared/menu' %>
NOTE: Partial filenames must always begin with an underscore, but we don’t use the underscores in the render arguments.
Rendering Partials for Objects or Collections
Given a @product variable that contains a Product object render a _product.html.erb file found in the products view folder.
<%= render @product %>
Given a collection of Product objects in @products render the views/products/_product.html.erb once for each Product.
<%= render @products %>
These are shortened forms for the fully expanded calls to the render command. The first of these is equivalent to:
<%= render partial: 'product', object: @product %>
The second is equivalent to:
<%= render partial: 'product', collection: @products %>
Resources
Rails partials have a lot more to offer, including local variables. Be sure to read through:
Displaying Images
The image_tag helper builds an HTML <img /> tag for the specified file. By default, files are loaded from app/assets/images.
To display the app/assets/images/fish.png image:
<%= image_tag "fish.png" %>
We can also any of the img tag attributes using symbols:
<%= image_tag "fish.png", , :width ='20%' %>
This would generate:
<img alt="Fish" src="/assets/fish.png" width="20%" />
For model objects that include an image string property (like in our blog app) we display the image within a view like this:
<%= image_tag @product.image %>
Assuming that @product is a Product model object from our blog.
We can use the form_with helper to bind a form to a model object.
Imagine a controller where the new and edit actions load a Post object into a @post variable. In the view, we could build a form bound to the Post model object:
<%= form_with(model: @post, local:true) do |f| %>
  <div>
      <%= f.label :title %><br/>
      <%= f.text_field :title %>
  </div>
  <div>
    <%= f.label :body %><br/>
    <%= f.text_area :body %>
  </div>
  <div>
    <%= f.label :image %><br/>
    <%= f.text_field :image %>
  </div>
  <%= f.submit %>
<% end %>
The f block argument is a form builder. We use it to build the various components of our form.
For example, this code:
<%= f.label :image %>
<%= f.text_field :image %>
Would generate these html form tags, associated with the Post object’s image property.
<label for="post_image">Image</label>
<input id="post_image" name="post[image]" size="30" type="text" value="" />
Resources
More information on dealing with generic forms, or model-centric forms read the Form Helper Rails Guide.
Rails makes it easy to associate one model with another by way of a foreign key. In our CRM example the customer model had a province_id property. To link the two models:
in app\models\customer.rb:
belongs_to :province
in app\models\province.rb:
has_many :customers
Then within the customers _form partial:
<div class="field">
  <%= f.label :province_id %><br />
  <%= f.collection_select :province_id, @provinces, :id, :name %>
</div>
This view code assumes that the @provinces instance variable contains a collection of all the Province objects from the provinces table. This instance variable would have to be added to any controller actions using this _form partial.
It also assumes that Province objects have a name property containing the name of the province.
Implementing a Keyword Search
An implementation of a keyword search can be seen in this Simple Store example. Specifically:
Note: This example Rails app uses an older version of Rails, but the search code linked to above should still be valid
Resources
Details on building forms using form_tag and the associated helpers can be found in the Form Helper guide.
The f.collection_select helper works nicely with form_for, but sometimes you want to build a select dropbox for use with a form_tag. For this we use a combination of select_tag and options_for_select.
<%= form_tag some_route_path do %>
   <%= select_tag :my_option, options_for_select(@some_array) %>
   <%= submit_tag "Search" %>
<% end %>
When this form is submitted the option selected by the user in the select dropdown will be found in params[:my_option].
The @some_array variable should be an array of strings to use as options for the select dropdown.
If your options are coming from an ActiveRecord collection, you can use the options_from_collection_for_select helper. The added benefit of this helper is that the value attributes of each option tag can be made to contain the ActiveRecord id of the collection members.
So for example, if you had an @categories collection of Category objects where each category had a name:
<%= select_tag :category, options_from_collection_for_select(@categories, 'id', 'name') %>
On submission of the form the selected category id could be found in params[:category].
Resources
Persistence with Session
HTTP, the protocol used for communication between web-servers and web-browsers is stateless. By this I mean that a web-server does not retain information about the user/browser between requests.
In the context of Rails this means that variables cannot retain their values between requests. All variables loose scope after a view is rendered.
Sessions were created to allow for data persistence across browser requests. In Rails, a session is a hash-like structure that allows a web-server to store and then restore objects across requests. Rails associates these persisted objects with specific users/browsers.
To allow us to persistent data cross browser request, Rails provides a special session hash.
Session Example
Imagine a controller action called remember_me:
def remember_me
  if session[:count].nil?
    session[:count] = 1
  else
    session[:count] += 1
  end
  @count = session[:count]
end
Each time this action is executed the @count will increase by one. Session is tied to a specific browser by way of a browser cookie. This means that a separate count will be maintained for each user that executes this action.
Controller Before Filters
Before filters are methods that are run before a controller action. Here’s some example code.
class SomeController < ApplicationController
  # Run some_method before all actions:
  before_action :some_method

  # Run method_name before the index and show actions:
  before_action :method_name, only: [:index, :show]

  # Run another_method before all actions except those shown:
  before_action :another_method, except: [:edit, :update]

  # The rest of the controller actions have been omitted.
end
Note that some_method, method_name and another_method must be defined within this controller, or within the ApplicationController.rb file. All controllers inherit the methods added to the ApplicationController.
Resources
Single User HTTP Authentication
Simple username/password protection can be added to a Rails project using HTTP digest authentication. In the application_controller.rb you need to add the following within the class definition:
private
USERS = { "admin" => "gorgonzola7!" }
def require_sudo
  authenticate_or_request_with_http_digest do |username|
    USERS[username]
  end
end
We can then use a before filter to protect all (or a subset of) any controller’s actions from within that controller:
before_action :require_sudo, only: [:update, :create, :destroy]
Debugging with Rails
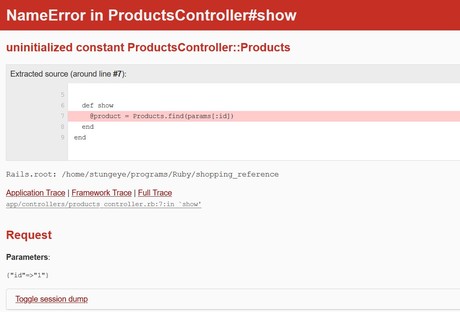
When something goes wrong with your Rails application it can sometimes be hard to know where to look to debug the problem.
To start, a careful reading of the information displayed in the browser will show you:
- The error type (in the header).
- The file where the error occurred.
- The line within that file where the error occurred.
- The error description (above the source extract).
- The contents of the
params hash (in the Parameters section).
- The contents of the
session hash (in toggle session dump).
Note: Sometimes Rails will indicate that the error occurred in a View, but the error description will reference SQL. This means you should look to the controller action associated with the View triggering the error.
Resources
Debugging Rails with the Web Console
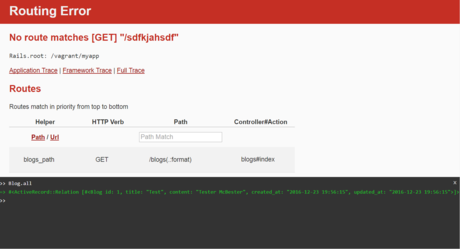
When Rails is in development mode it will supply you with an interactive Ruby console in your web browser when it encounters an error.
The next time you get a Rails error try typing Ruby code into the web console. You can access your Active Record models from this console too.
Console Breakpoints
You can also use the web console as a way to put debugging breakpoints into your code.
For example, in a controller action you could trigger the web console like this:
def show
  @product = Product.find(params[:id])
  console # Trigger the web console for debugging.
end
And then within the web console you could inspect the state:
>> @product <enter>
=> #<Product id: 13, name: "Heavy Duty Wooden Keyboard", price_cents: 84289, description: "Error quisquam temporibus pariatur fugiat nemo num...", created_at: "2020-11-23 17:22:55", updated_at: "2020-11-23 17:45:50">
>> params[:id] <enter>
=> "13"
>>
Resources
Debugging with Debug
When debugging a view file you will sometimes wish to inspect the contents of a variable. The debug helper lets you do this:
<%= debug @object_you_wish_to_debug %>
Now when you load this view in your browser, you will see the contents of your object. For ActiveRecord object you will be shown all the object properties. For Arrays you will be shown the contents of all the objects in the Array.
If your debug output look like this:
- []
That means you are attempting to view an empty array.
Debugging with the Logger
When debugging a controller you may also wish to inspect the contents of your variables. The easiest way to do this is to print strings to the rails s server output in the console.
To write to the server logs from your controller:
logger.debug("This is a debugging message.")
You can also interpolate variables into your log messages:
logger.debug("The query returned #{@products.size} posts.")
(Assuming @products is a collection of Product objects.)